
[ 섹션 1. 데이터 갖고 놀기 ]
# 2진수, 10진수, 16진수
- 10진수 : 0, 1, 2, 3, 4, 5, 6, 7, 8, 9 ...
- 2진수 : 0b0, 0b1, 0b10, 0b11, 0b100, 0b101, 0b110, 0b111, 0b1000, 0b1001 ...
- 16진수 : 0x0, 0x1, 0x2, 0x3, 0x4, 0x5, 0x6, 0x7, 0x8, 0x9, 0xA, 0xB, 0xC, 0xD, 0xE, 0xF ...
~> 2진수를 4개씩 끊어서 표현
- 즉, int hp = 100 (10진수), int hp = 0b01100100 (2진수), int hp = 0x64 (16진수) 모두 같은 값을 대입하는 것이다.
# 정수 범위의 비밀
- 최상위 Bit는 부호 Bit에 해당하며, 대부분의 System에서는 2의 보수법을 통해 음수를 표현한다.
# float
- 컴퓨터는 부동 소수점 (float / double)을 최대한의 근차시 값으로 표현하기 때문에 연산 결과가 정확하지 않을 수 있다.
- float는 4Byte 수까지 표현할 수 있고, double은 8Byte 수까지 표현할 수 있다.
~> double이 float에 비해 더 많은 메모리를 차지하지만, 숫자를 보다 더 정밀하게 표현할 수 있다.
~> 실수 뒤에 f를 붙일 경우 float, 붙이지 않을 경우 double로 인식한다.
# 스트링 포맷
- int, float, short, double 등의 Type들은 ( )를 통해 Casting이 가능하다.
~> int a, short b 가 있을때 b = (short)a 를 통해 Casting 할 수 있다.
~> 하지만 string Type은 int a, string b 가 있을때 b = (string)a 와 같이 ( )를 통해 Casting 할 수 없다.
사용자로부터 입력을 받기 위한 방법namespace CSharpStudy { class Program { static void Main(string[] args) { string input = Console.ReadLine(); // Enter를 누르는 순간에 변수에 저장된다. Console.WriteLine(); } } }
사용자로부터 입력 받은 string을 int로 Casting 하는 방법namespace CSharpStudy { class Program { static void Main(string[] args) { int number; string input = Console.ReadLine(); // Enter를 누르는 순간에 변수에 저장된다. number = int.Parse(input); Console.WriteLine(); } } }
String Format 방식namespace CSharpStudy { class Program { static void Main(string[] args) { int hp = 80; int maxHp = 100; string msg = string.Format("당신의 HP는 {0}/{1} 입니다.", hp, maxHp); Console.WriteLine(msg); } } }
String Interpolation 방식namespace CSharpStudy { class Program { static void Main(string[] args) { int hp = 100; int maxHp = 100; // 엄밀히 말하면 Casting과는 거리가 멀긴 하다. string msg = $"당신의 HP는 {hp}/{maxHp} 입니다."; Console.WriteLine(msg); } } }
# 산술 연산
삼항 연산자 응용namespace CSharpStudy { class Program { static void Main(string[] args) { int number = 25; bool isPair = ((number % 2 == 0) ? true : false); } } }
# 데이터 마무리
- var Keyword를 통한 변수 선언시 Type을 직접 선언한 것처럼 컴파일러가 추론을 통해 Type 을 결정해준다.
~> var a = 10, var b = 4.14f, var c = "Hello", var d = true;
~> 그러나 가독성을 위해 Type을 직접 명시해주는 것이 좋다.
[ 섹션 2. 코드의 흐름 제어 ]
# switch
- switch문은 if/else문에 비해 응용 범위가 넓지 않다.
- 어떤 case문에도 해당되지 않을 경우 default문이 실행된다.
- case문에는 반드시 변수가 아닌 상수를 넣어야 한다.
switch문 응용namespace CSharpStudy { class Program { static void Main(string[] args) { int choice = 0; // 0: 가위, 1: 바위, 2: 보, 3: 치트키 switch (choice) { case 0: Console.WriteLine("가위입니다."); break; case 1: Console.WriteLine("바위입니다."); break; case 2: Console.WriteLine("보입니다."); break; case 3: Console.WriteLine("치크티입니다."); break; default: Console.WriteLine("다 실패했습니다."); break; } } } }
# 가위-바위-보 게임
간단한 가위-바위-보 게임 구현 #1namespace CSharpStudy { class Program { static void Main(string[] args) { // 0: 가위, 1: 바위, 2: 보 Random rand = new Random(); int aiChoice = rand.Next(0, 3); // 0 ~ 2 사이의 랜덤 값 int choice = Convert.ToInt32(Console.ReadLine()); // 사용자로부터 입력 받은 값을 숫자로 변형하여 대입 switch (choice) { case 0: Console.WriteLine("당신의 선택은 가위입니다."); break; case 1: Console.WriteLine("당신의 선택은 바위입니다."); break; case 2: Console.WriteLine("당신의 선택은 보입니다."); break; } switch (aiChoice) { case 0: Console.WriteLine("컴퓨터의 선택은 가위입니다."); break; case 1: Console.WriteLine("컴퓨터의 선택은 바위입니다."); break; case 2: Console.WriteLine("컴퓨터의 선택은 보입니다."); break; } if (choice == 0) { if (aiChoice == 0) Console.WriteLine("무승부입니다."); else if (aiChoice == 1) Console.WriteLine("패배입니다."); else Console.WriteLine("승리입니다."); } else if (choice == 1) { if (aiChoice == 0) Console.WriteLine("승리입니다."); else if (aiChoice == 1) Console.WriteLine("무승부입니다."); else Console.WriteLine("패배입니다."); } else { if (aiChoice == 0) Console.WriteLine("패배입니다."); else if (aiChoice == 1) Console.WriteLine("승리입니다."); else Console.WriteLine("무승부입니다."); } } } }
간단한 가위-바위-보 게임 구현 #2namespace CSharpStudy { class Program { static void Main(string[] args) { // 0: 가위, 1: 바위, 2: 보 Random rand = new Random(); int aiChoice = rand.Next(0, 3); // 0 ~ 2 사이의 랜덤 값 int choice = Convert.ToInt32(Console.ReadLine()); // 사용자로부터 입력 받은 값을 숫자로 변형하여 대입 switch (choice) { case 0: Console.WriteLine("당신의 선택은 가위입니다."); break; case 1: Console.WriteLine("당신의 선택은 바위입니다."); break; case 2: Console.WriteLine("당신의 선택은 보입니다."); break; } switch (aiChoice) { case 0: Console.WriteLine("컴퓨터의 선택은 가위입니다."); break; case 1: Console.WriteLine("컴퓨터의 선택은 바위입니다."); break; case 2: Console.WriteLine("컴퓨터의 선택은 보입니다."); break; } if (choice == aiChoice) Console.WriteLine("무승부입니다."); else if (choice == 0 && aiChoice == 2) Console.WriteLine("승리입니다."); else if (choice == 1 && aiChoice == 0) Console.WriteLine("승리입니다."); else if (choice == 2 && aiChoice == 1) Console.WriteLine("승리입니다."); else Console.WriteLine("패배입니다."); } } }
# 상수와 열거형
- const Keyword를 통해 상수 필드 또는 로컬 상수를 선언할 수 있다.
- enum Keyword는 열거형 상수를 표현하기 위한 것으로 이를 통해 상수 숫자들을 보다 의미있는 단어들로 표현할 수 있다.
~> 가독성 측면에서 도움이 된다.
~> 별도의 지정이 없을 경우 첫번째 요소는 0, 두번째 요소는 1 등과 같이 1씩 증가된 값들을 할당받는다.
상수를 통한 가위-바위-보 게임 수정namespace CSharpStudy { class Program { static void Main(string[] args) { const int ROCK = 1; const int PAPER = 2; const int SCISSORS = 0; Random rand = new Random(); int aiChoice = rand.Next(0, 3); // 0 ~ 2 사이의 랜덤 값 int choice = Convert.ToInt32(Console.ReadLine()); // 사용자로부터 입력 받은 값을 숫자로 변형하여 대입 switch (choice) { case SCISSORS: Console.WriteLine("당신의 선택은 가위입니다."); break; case ROCK: Console.WriteLine("당신의 선택은 바위입니다."); break; case PAPER: Console.WriteLine("당신의 선택은 보입니다."); break; } switch (aiChoice) { case SCISSORS: Console.WriteLine("컴퓨터의 선택은 가위입니다."); break; case ROCK: Console.WriteLine("컴퓨터의 선택은 바위입니다."); break; case PAPER: Console.WriteLine("컴퓨터의 선택은 보입니다."); break; } if (choice == aiChoice) Console.WriteLine("무승부입니다."); else if (choice == SCISSORS && aiChoice == PAPER) Console.WriteLine("승리입니다."); else if (choice == ROCK && aiChoice == SCISSORS) Console.WriteLine("승리입니다."); else if (choice == PAPER && aiChoice == ROCK) Console.WriteLine("승리입니다."); else Console.WriteLine("패배입니다."); } } }
열거형을 통한 가위-바위-보 게임 수정namespace CSharpStudy { class Program { enum Choice // 명시적으로 값을 선언하지 않을 경우 0부터 시작 { Rock = 1, Paper = 2, Scissors = 0 } static void Main(string[] args) { Random rand = new Random(); int aiChoice = rand.Next(0, 3); // 0 ~ 2 사이의 랜덤 값 int choice = Convert.ToInt32(Console.ReadLine()); // 사용자로부터 입력 받은 값을 숫자로 변형하여 대입 switch (choice) { case (int)Choice.Scissors: Console.WriteLine("당신의 선택은 가위입니다."); break; case (int)Choice.Rock: Console.WriteLine("당신의 선택은 바위입니다."); break; case (int)Choice.Paper: Console.WriteLine("당신의 선택은 보입니다."); break; } switch (aiChoice) { case (int)Choice.Scissors: Console.WriteLine("컴퓨터의 선택은 가위입니다."); break; case (int)Choice.Rock: Console.WriteLine("컴퓨터의 선택은 바위입니다."); break; case (int)Choice.Paper: Console.WriteLine("컴퓨터의 선택은 보입니다."); break; } if (choice == aiChoice) Console.WriteLine("무승부입니다."); else if (choice == (int)Choice.Scissors && aiChoice == (int)Choice.Paper) Console.WriteLine("승리입니다."); else if (choice == (int)Choice.Rock && aiChoice == (int)Choice.Scissors) Console.WriteLine("승리입니다."); else if (choice == (int)Choice.Paper && aiChoice == (int)Choice.Rock) Console.WriteLine("승리입니다."); else Console.WriteLine("패배입니다."); } } }
# while
do while문 응용namespace CSharpStudy { class Program { static void Main(string[] args) { string answer; // y를 입력할때까지 무한히 반복 do { Console.WriteLine("강사님은 잘생기셨나요? (y/n) : "); answer = Console.ReadLine(); } while (answer != "y"); Console.WriteLine("정답입니다!"); } } }
# ref, out
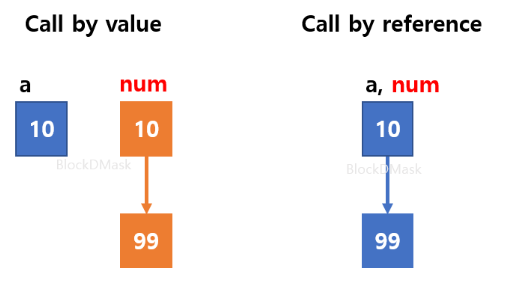
- 기본적으로 C#은 메소드에 매개변수를 전달할 때 call by value (값 전달) 을 한다.
~> 이때 ref Keyword를 통해 명시적으로 call by reference (참조 전달)을 할 수 있다.
ref Keyword 응용namespace CSharpStudy { class Program { static void AddOne (ref int num) { num = num + 1; } static void Main(string[] args) { int a = 0; Program.AddOne(ref a); // 같은 Class 내의 함수를 호출시 Program 생략 가능 Console.WriteLine(a); } } }
- out Keyword는 매개변수 한정자로 변수가 참조로 전달이 된다.
~> out Keyword를 사용한 매개변수는 함수 내부에서 반드시 값을 초기화 시켜줘야 한다.
~> 여러개의 값을 반환해야 하는 경우에 유용하다.
out Keyword 응용namespace CSharpStudy { class Program { // result1는 몫, result2는 나머지 static void Divide(int a, int b, out int result1, out int result2) { result1 = a / b; result2 = a % b; } static void Main(string[] args) { int num1 = 10; int num2 = 3; int result1; int result2; Divide(10, 3, out result1, out result2); Console.WriteLine(result1); Console.WriteLine(result2); } } }
# 오버로딩
- 오버로딩의 사전적 의미는 "과적하다" 이며, 간단하게 말하면 함수 이름의 재사용이다.
~> 오버로딩시 하나의 메소드에 여러개의 구현을 과적할 수 있다.
~> 오버로딩은 같은 메소드 이름으로 매개변수의 개수, Type을 다르게 정의할 수 있다.
~> 반환 값은 오버로딩에 영향을 주지 않는다. (즉, 반환값만 달리 할 경우 오버로딩 X)
오버로딩 응용namespace CSharpStudy { class Program { // 함수 이름의 재사용 static int Add(int a, int b) { return a + b; } static int Add(int a, int b, int c) { return a + b + c; } static float Add(float a, float b) { return a + b; } static void Main(string[] args) { int result = Program.Add(2, 3); float result2 = Program.Add(2.0f, 3.0f); } } }
- 선택적 매개변수란 매개 변수를 필수 또는 선택 사항으로 지정할 수 있다.
선택적 매개변수 응용 #1namespace CSharpStudy { class Program { // 선택적 매개변수 static int Add(int a, int b, int c = 0) { return a + b + c; } static void Main(string[] args) { int result = Program.Add(1, 2); int result2 = Program.Add(1, 2, 3); } } }
선택적 매개변수 응용 #2namespace CSharpStudy { class Program { // 선택적 매개변수 static int Add(int a, int b, int c = 0, float d = 1.0f, double e = 3.0) { return a + b + c; } static void Main(string[] args) { int result = Program.Add(1, 2, d: 2.0f); } } }
[ 섹션 3. TextRPG ]
# 디버깅 기초
1. 우선 변수의 값, 메모리 동작 또는 코드 분기의 실행 여부를 확인하기 위해 실행 중인 코드를 일시 중단해야 하는 위치에 중단점을 설정한다.
2. F5를 통해 디버깅을 시작할 수 있고, 디버깅이 시작된 뒤 노란색 화살표는 일시 중지된 문을 가리킨다.
3. F10을 통해 프로시저 단위로 실행할 수 있고, F11을 통해 코드를 한 단계씩 실행할 수도 있다.
~> 프로시저는 메소드 (함수) 와 같다. (즉, 어떤 함수를 만나더라도 해당 함수로 들어가지 말고 결과만 보겠다는 것)
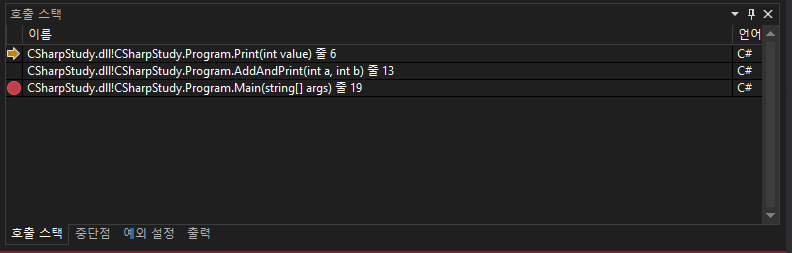
디버깅시 호출 스택을 통해 경로를 파악할 수 있다.
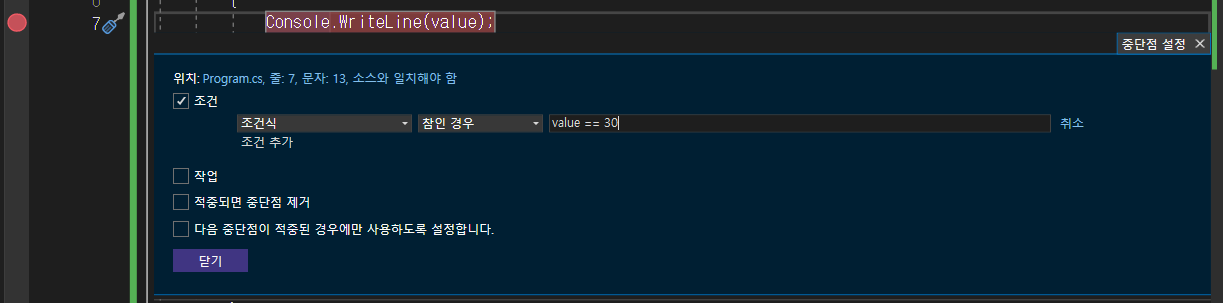
중단점에 [ 오른쪽 마우스 ] - [ 조건 ] 을 통해 조건을 설정할 수 있다.

디버깅시 중단점 위의 노란색 화살표를 드래그하여 실행 순서를 마음대로 조절할 수 있다.
# TextRPG 직업 고르기
TextRPG 직업 고르기namespace CSharpStudy { class Program { enum ClassType { None = 0, Knight = 1, Archer = 2, Mage = 3 } static ClassType ChooseClass() { Console.WriteLine("직업을 선택하세요!"); Console.WriteLine("[1] 기사"); Console.WriteLine("[2] 궁수"); Console.WriteLine("[3] 법사"); ClassType choice = ClassType.None; string input = Console.ReadLine(); switch (input) { case "1": choice = ClassType.Knight; break; case "2": choice = ClassType.Archer; break; case "3": choice = ClassType.Mage; break; } return choice; } static void Main(string[] args) { while (true) { ClassType choice = ChooseClass(); if (choice != ClassType.None) break; } } } }
# TextRPG 플레이어 생성 (구조체)
- 구조체는 하나 이상의 변수들을 묶어서 그룹으로 만드는 사용자 정의 자료형이다.
+ 추가 검색 ( https://usingsystem.tistory.com/6 )
- Class와 구조체의 차이점
1. Class는 Heap 영역에 할당되지만, 구조체는 Stack 영역에 할당된다.
2. Class는 참조 타입이지만, 구조체는 값 타입이다.
3. Class는 상속이 가능하지만, 구조체는 상속이 불가능하다.
TextRPG 플레이어 생성 (구조체 응용)namespace CSharpStudy { class Program { // ... struct Player { public int hp; public int attack; } // ... static void CreatePlayer(ClassType choice, out Player player) { switch (choice) { case ClassType.Knight: player.hp = 100; player.attack = 10; break; case ClassType.Archer: player.hp = 75; player.attack = 12; break; case ClassType.Mage: player.hp = 50; player.attack = 15; break; default: player.hp = 0; player.attack = 0; break; } } static void Main(string[] args) { while (true) { ClassType choice = ChooseClass(); if (choice != ClassType.None) { // 캐릭터 생성 Player player; CreatePlayer(choice, out player); } } } } }
# TextRPG 몬스터 생성
TextRPG 몬스터 생성using System.Diagnostics.Tracing; namespace CSharpStudy { class Program { // ... enum MonsterType { None = 0, Slime = 1, Orc = 2, Skeleton = 3 } struct Monster { public int hp; public int attack; } // ... static void CreateRandomMonster(out Monster monster) { Random rand = new Random(); int randMonster = rand.Next(1, 4); switch (randMonster) { case (int)MonsterType.Slime: Console.WriteLine("슬라임이 스폰되었습니다!"); monster.hp = 20; monster.attack = 2; break; case (int)MonsterType.Orc: Console.WriteLine("오크가 스폰되었습니다!"); monster.hp = 40; monster.attack = 4; break; case (int)MonsterType.Skeleton: Console.WriteLine("스켈레톤이 스폰되었습니다!"); monster.hp = 30; monster.attack = 3; break; default: monster.hp = 0; monster.attack = 0; break; } } static void EnterField() { Console.WriteLine("필드에 접속했습니다!"); // 랜덤으로 1~3 몬스터 중 하나를 스폰 Monster monster; CreateRandomMonster(out monster); Console.WriteLine("[1] 전투 모드로 돌입"); Console.WriteLine("[2] 일정 확률로 마을로 도망"); } // ... static void Main(string[] args) { while (true) { ClassType choice = ChooseClass(); if (choice != ClassType.None) { // 캐릭터 생성 Player player; CreatePlayer(choice, out player); // 게임 입장 EnterGame(); } } } } }
# TextRPG 전투
TextRPG 전투using System.Diagnostics.Tracing; using System.Numerics; namespace CSharpStudy { class Program { // ... static void Fight(ref Player player, ref Monster monster) { while (true) { // player가 monster 공격 monster.hp -= player.attack; if (monster.hp <= 0) { Console.WriteLine("승리했습니다!"); Console.WriteLine($"남은 체력 : {player.hp}"); break; } // monster의 반격 player.hp -= monster.attack; if (player.hp <= 0) { Console.WriteLine("패배했습니다!"); break; } } } static void EnterField(ref Player player) { while (true) { Console.WriteLine("필드에 접속했습니다!"); // 랜덤으로 1~3 몬스터 중 하나를 스폰 Monster monster; CreateRandomMonster(out monster); Console.WriteLine("[1] 전투 모드로 돌입"); Console.WriteLine("[2] 일정 확률로 마을로 도망"); string input = Console.ReadLine(); if (input == "1") Fight(ref player, ref monster); else if (input == "2") { // 도망칠 확률이 33% Random rand = new Random(); int randValue = rand.Next(0, 101); if (randValue <= 33) { Console.WriteLine("도망치는데 성공했습니다!"); } else Fight(ref player, ref monster); } } } static void EnterGame(ref Player player) { while (true) { Console.WriteLine("마을에 접속했습니다!"); Console.WriteLine("[1] 필드로 간다"); Console.WriteLine("[2] 로비로 돌아가기"); string input = Console.ReadLine(); if (input == "1") EnterField(ref player); else if (input == "2") break; } } static void Main(string[] args) { while (true) { ClassType choice = ChooseClass(); if (choice == ClassType.None) continue; // 캐릭터 생성 Player player; CreatePlayer(choice, out player); // 게임 입장 EnterGame(ref player); } } } }
[ 섹션 4. 객체지향 여행 ]
# 객체지향의 시작
- 객체 지향 프로그래밍 (Object Oriented Programming) 을 OOP 라고 한다.
- Object (객체) : Obejct는 설계도에 해당하는 Class를 통해 생성된 실체화된 것이다. (사람, 사물 등)
- Class (클래스) : Class는 Object를 만들기 위한 설계도와 같다.
~> 해당 객체가 어떤 속성과 기능을 가지는지 정의하는 역할을 한다.
- Instance (인스턴스) : Instance는 Class를 통해 Obejct를 생성한 결과물과 같다.
~> Class를 통해 Object를 생성하는 것을 인스턴스화 한다고 한다.
Class를 통해 Object를 인스턴스화 하기 위한 예제namespace CSharpStudy { class Knight { public int hp; public int attack; public void Move() { Console.WriteLine("Knight Move"); } public void Attack() { Console.WriteLine("Knight Attack"); } } class Program { static void Main(string[] args) { Knight knight = new Knight(); knight.hp = 100; knight.attack = 10; knight.Move(); knight.Attack(); } } }
# 복사(값)와 참조
Class와 Struct의 가장 큰 차이점namespace CSharpStudy { class Knight { public int hp; public int attack; } struct Mage { public int hp; public int attack; } class Program { static void KillKnight(Knight night) { night.hp = 0; } static void KillMage(Mage mage) { mage.hp = 0; } static void Main(string[] args) { // struct는 복사 Mage mage; // struct는 = new Mage() 생략이 가능 mage.hp = 100; mage.attack = 50; KillMage(mage); // 함수 결과로 mage의 hp는 그대로 100 Mage mage2 = mage; mage2.hp = 0; // 함수 결과로 mage의 hp는 그대로 100 // class는 참조 Knight knight = new Knight(); knight.hp = 100; knight.attack = 10; KillKnight(knight); // 함수 결과로 knight의 hp는 0 Knight knight2 = knight; knight2.hp = 100; // 함수 결과로 knight의 hp는 100 } } }
얕은 복사와 깊은 복사의 차이namespace CSharpStudy { class Knight { public int hp; public int attack; public Knight Clone() { Knight knight = new Knight(); knight.hp = hp; knight.attack = attack; return knight; } } class Program { static void KillKnight(Knight night) { night.hp = 0; } static void Main(string[] args) { // 얕은 복사 Knight knight = new Knight(); knight.hp = 100; knight.attack = 10; Knight knight2 = knight; knight2.hp = 0; // 함수 결과로 knight의 hp는 0 // 깊은 복사 Knight knight3 = knight.Clone(); knight2.hp = 100; // 함수 결과로 knight의 hp는 그대로 0 } } }
# 스택과 힙
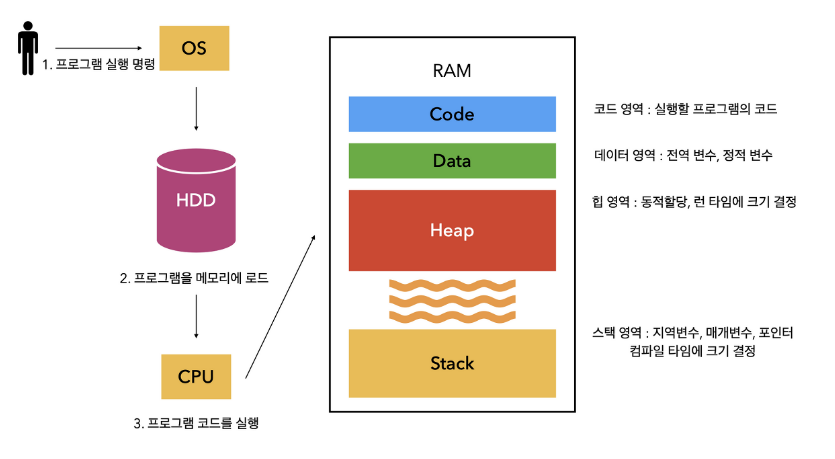
- Stack과 Heap은 데이터를 위한 Memory 라는 공통점을 가지지만, 용도에 따라 구분된다.
- Stack은 메소드의 실행, 해당 메소드로 전달되는 매개변수, 메소드 내에서 사용되는 지역변수를 처리한다.
~> Stack은 불완전하고 일시적으로 사용하는 Memory로 메모장과 같은 존재다.
~> Stack 영역은 이름에서 알 수 있듯 자료구조에서 다루는 Stack과 동작방식이 같다. (LIFO)
~> Stack 영역은 메소드의 실행이 끝날 경우 해당 메소드와 관련된 영역은 해제된다.
~> new 연산자를 사용하여 객체 생성시 실제 데이터 자체는 Heap 영역에, 데이터 주소는 Stack 영역에 저장된다.
~> Stack 영역은 값 형식이다.
- Heap은 동적으로 할당되는 데이터와 객체들을 처리한다. (주로 Class)
~> Heap 영역은 new 연산자를 사용하여 객체를 생성하거나 메모리를 동적으로 할당시 사용된다.
~> C#은 C++과 달리 GC가 Heap 영역을 관리하여 Memory 누수 및 기타 문제를 방지한다.
(C++은 프로그래머가 직접 delete를 통해 해제를 해야지만 Memory 누수 및 기타 문제를 방지 가능)
~> Heap 영역은 참조 형식이다.
# 생성자
- 생성자는 반환 형식을 선언하지 않는다.
- this() 생성자는 생성자에서 본인의 다른 생성자를 호출한다.
- 매개변수를 받는 생성자를 생성시, 기본 생성자를 따로 만들어주지 않는 이상 기본 생성자는 사용이 불가능하다.
생성자 응용 및 this() 생성자 응용namespace CSharpStudy { class Knight { public int hp; public int attack; public int defense; public Knight() { hp = 100; attack = 10; defense = 10; } public Knight(int hp) { this.hp = hp; } public Knight(int hp, int attack) : this(hp) { this.attack = attack; } public Knight(int hp, int attack, int defense) : this(hp, attack) { this.defense = defense; } } class Program { static void Main(string[] args) { Knight knight = new Knight(); } } }
# static의 정체
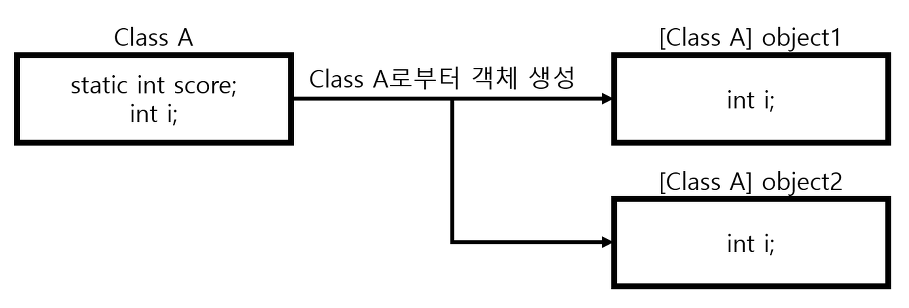
- Class 내부의 필드 값은 각 Instance 마다 제각각일 수 있다. (즉, 인스턴스마다 고유한 값을 가질 수 있다.)
~> Class를 통해 Instance가 생성될 때 각 객체마다 따로 생긴다.
- Class 내부에 static과 함께 선언한 필드와 메소드는 각 Instance에 종속되는 것이 아닌 해당 Class에 종속된다.
~> 해당 Class가 처음 사용될 때 한번 초기화 되며, 그 뒤로는 계속해서 동일한 Memory를 사용한다.
~> Class 내부에 static과 함께 선언한 필드와 메소드 사용시 Class이름.필드/메소드이름 과 같이 접근해야한다.
~> static을 통해 Class로 부터 Instance를 생성하지 않고 필드와 메소드를 호출할 수 있다.
- Class 내부에 static과 함께 선언한 메소드 내부에서는 static 필드만 사용 가능하다. (Class의 Instance 필드 참조 불가능)
~> 다만 내부에서 새로운 객체 생성시 해당 객체의 필드 참조는 가능하다.
- static과 함께 선언한 Class는 모든 멤버가 static 필드, static 메소드로 이루어져 있으며, 객체를 생성할 수 없다.
static 응용namespace CSharpStudy { class Knight { // 정적 필드 static public int counter = 1; public int id; public int hp; public int attack; // 정적 메소드 static public void AddCounter() { counter++; } // 정적 메소드 (static이라고 해서 Instance에 접근을 못하는 것은 X) static public Knight CreateKnight() { Knight knight = new Knight(); // 다만 내부에서 새로운 객체를 생성해야 한다. knight.hp = 100; knight.attack = 5; return knight; } public Knight() { id = counter++; hp = 100; attack = 10; } } class Program { static void Main(string[] args) { Knight knight = Knight.CreateKnight(); } } }
# 상속성
- 상속성은 OOP 특징 중 하나이다.
- 부모 Class (기반 Class) 로부터 상속하여 새로운 자식 Class (파생 Class)를 만들 수 있다.
- 상속을 통해 부모 Class의 필드 및 메소드들을 자식 Class에서 사용할 수 있다.
상속 응용namespace CSharpStudy { class Player // 부모 Class 또는 기반 Class { static public int counter = 1; public int id; public int hp; public int attack; public void Move() { Console.WriteLine("Player Move!"); } public void Attack() { Console.WriteLine("Player Attack!"); } } class Knight : Player // 자식 Class 또는 파생 Class { public void Stun() { Console.WriteLine("Stun!"); } } class Program { static void Main(string[] args) { Knight knight = new Knight(); knight.Move(); knight.Attack(); } } }
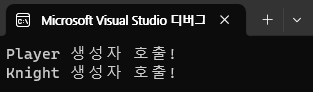
상속시 생성자 응용 #1 (자식클래스가 생성될때 부모 Class의 생성자가 먼저 호출)namespace CSharpStudy { class Player // 부모 Class 또는 기반 Class { static public int counter = 1; public int id; public int hp; public int attack; public Player() { Console.WriteLine("Player 생성자 호출!"); } } class Knight : Player // 자식 Class 또는 파생 Class { public Knight() { Console.WriteLine("Knight 생성자 호출!"); } static public Knight CreateKnight() { Knight knight = new Knight(); knight.hp = 100; knight.attack = 5; return knight; } } class Program { static void Main(string[] args) { Knight knight = Knight.CreateKnight(); } } }
상속시 생성자 응용 #2 (부모의 생성자가 여러개 존재할 경우 부모의 기본 생성자를 호출)namespace CSharpStudy { class Player // 부모 Class 또는 기반 Class { static public int counter = 1; public int id; public int hp; public int attack; public Player() { Console.WriteLine("Player 생성자 호출!"); } public Player(int hp) { this.hp = hp; Console.WriteLine("Player hp 생성자 호출!"); } } class Knight : Player // 자식 Class 또는 파생 Class { public Knight() { Console.WriteLine("Knight 생성자 호출!"); } static public Knight CreateKnight() { Knight knight = new Knight(); knight.hp = 100; knight.attack = 5; return knight; } } class Program { static void Main(string[] args) { Knight knight = Knight.CreateKnight(); } } }
상속시 생성자 응용 #3 및 base() 생성자 응용namespace CSharpStudy { class Player // 부모 Class 또는 기반 Class { static public int counter = 1; public int id; public int hp; public int attack; public Player() { Console.WriteLine("Player 생성자 호출!"); } public Player(int hp) { this.hp = hp; Console.WriteLine("Player hp 생성자 호출!"); } } class Knight : Player // 자식 Class 또는 파생 Class { public Knight() : base(100) { Console.WriteLine("Knight 생성자 호출!"); } static public Knight CreateKnight() { Knight knight = new Knight(); knight.hp = 100; knight.attack = 5; return knight; } } class Program { static void Main(string[] args) { Knight knight = Knight.CreateKnight(); } } }


# 은닉성
- 은닉성은 OOP 특징 중 하나이다.
- 사용자에게 필요한 최소의 기능만을 노출하고 내부를 감추는 것이다.
접근 제한자를 통한 은닉성 응용namespace CSharpStudy { class Knight { int hp; // 접근 제한자를 선언하지 않은 경우 기본적으로 private public void SetHp(int hp) { this.hp = hp; } } class Program { static void Main(string[] args) { Knight knight = new Knight(); knight.SetHp(100); } } }
+ 추가 검색 ( https://usingsystem.tistory.com/6 )
- 은닉성 구현 방법
1. 접근 제한자
2. 프로퍼티
3. 레코드
4. 무명형식
# 클래스 형식 변환
- 자식 클래스 ~> 부모 클래스 변환은 문제가 발생하지 않는다.
- 부모 클래스 ~> 자식 클래스 변환은 문제가 발생한다.
~> 문제가 발생하는지는 프로그램을 실행해봐야만 확인이 가능하다.
~> 이를 is 연산자와 as 연산자를 통해 해결할 수 있다.
클래스 형식 변환 예시 (실행 결과는 오류 발생)namespace CSharpStudy { class Player { protected int hp; protected int attack; } class Knight : Player { } class Mage : Player { public int mp; } class Program { static void Main(string[] args) { Knight knight = new Knight(); Mage mage = new Mage(); // 자식 클래스 -> 부모 클래스 변환은 문제 X Player player = knight; // 부모 클래스 -> 자식 클래스 변환은 문제 발생 Mage otherMage = (Mage)player; // 프로그램을 실행해봐야 오류 발견 가능 } } }
is 연산자를 통한 클래스 형식 변환 예시 오류 수정namespace CSharpStudy { class Player { protected int hp; protected int attack; } class Knight : Player { } class Mage : Player { public int mp; } class Program { static void EnterGame(Player player) { // is 문법을 통한 오류 수정 bool isMage = player is Mage; if (isMage) { Mage mage = (Mage)player; mage.mp = 10; } } static void Main(string[] args) { Knight knight = new Knight(); Mage mage = new Mage(); EnterGame(knight); } } }
as 연산자를 통한 클래스 형식 변환 예시 오류 수정namespace CSharpStudy { class Player { protected int hp; protected int attack; } class Knight : Player { } class Mage : Player { public int mp; } class Program { static void EnterGame(Player player) { // as 문법을 통한 오류 수정 Mage mage = player as Mage; if (mage != null) { mage.mp = 10; } } static void Main(string[] args) { Knight knight = new Knight(); Mage mage = new Mage(); EnterGame(knight); } } }
+ 추가 검색 ( https://dybz.tistory.com/94 )
- is 연산자
~> Casting 가능 여부만을 판단한다.
~> Casting이 가능한 경우 true를, 불가능한 경우 false를 return한다.
- as 연산자
~> Casting시 사용한다.
~> Casting에 성공할 경우 Casting 결과를, 실패할 경우 null을 return한다.
# 다형성
- 다형성은 OOP 특징 중 하나이다.
- 다형성은 Object가 여러 형태를 가질 수 있다는 것을 의미한다.
- virtual Keyword는 자식 Class에서 재정의 (override) 를 할 수 있도록 만들어준다.
- override Keyword는 부모 Class에서 virtual이나 abstract로 선언된 메소드나 프로퍼티를 재정의 (override) 한다.
virtual Keyword와 override Keyword 응용using System.Diagnostics.Tracing; using System.Numerics; namespace CSharpStudy { class Player { protected int hp; protected int attack; public virtual void Move() { Console.WriteLine("Player 이동!"); } } class Knight : Player { public override void Move() { base.Move(); // 부모 Class가 가진 Move() 메소드를 실행 Console.WriteLine("Knight 이동!"); } } class Program { static void EnterGame(Player player) { player.Move(); // 매개변수의 Type은 Player지만 override를 통해 knight의 Move() 메소드가 실행 } static void Main(string[] args) { Knight knight = new Knight(); EnterGame(knight); } } }
- virtual과 abstract의 차이점
~> virtual Keyword 사용시 자식 Class에서 필요에 따라 재정의 (override) 할 수 있지만 필수는 아니다.
~> virtual Keyword 사용시 객체 생성이 가능하다.
~> abstract Keyword 사용시 abstract Class는 자체적으로 구현이 불가능하고, 자식 Class에서 반드시 구현해야 한다.
~> abstract Keyword 사용시 Class 또한 abstract으로 선언한다.
~> abstract Keyword 사용시 객체 생성이 불가능하다. (abstract class 를 상속받은 class는 객체 생성 가능)
+ 추가 검색 ( https://ssabi.tistory.com/49 )
- overloading과 overriding의 차이
~> overloading의 사전적 의미는 "과적하다" 이다.
~> overloading은 하나의 메소드에 여러개의 구현을 과적할 수 있다.
~> overriding의 사전적 의미는 "더 중요한", "최우선시 되는" 이다.
~> overriding은 부모 Class에서 물려받은 메소드를 자식 Class에서 재정의하여 자식 클래스의 메소드가 더 우선시 된다.
# 문자열 둘러보기
string 관련 메소드들using System.Diagnostics.Tracing; using System.Numerics; namespace CSharpStudy { class Program { static void Main(string[] args) { string name = "Harry Potter"; // 1. 찾기 bool found = name.Contains("Harry"); int index = name.IndexOf('P'); // 찾지 못할 경우 -1 을 return // 2. 변형 name = name + " Junior"; string lowerCaseName = name.ToLower(); string upperCaseName = name.ToUpper(); string newName = name.Replace('r', 'l'); // 3. 분할 string[] names = name.Split(new char[] { ' ' }); string substringName = name.Substring(5); } } }
[ 섹션 5. TextRPG2 ]
# TextRPG2 플레이어 & 몬스터 생성
TextRPG2에서 모든 생명체를 위한 부모 Class Creature 생성using System; using System.Collections.Generic; using System.Linq; using System.Text; using System.Threading.Tasks; namespace CSharpStudy { public enum CreatureType { None, Player = 1, Monster = 2 } class Creature { CreatureType type; protected int hp = 0; protected int attack = 0; protected Creature(CreatureType type) { this.type = type; } public void SetInfo(int hp, int attack) { this.hp = hp; this.attack = attack; } public int GetHp() { return hp; } public int GetAttack() { return attack; } public bool IsDead() { return hp <= 0; } public void OnDamaged(int damage) { hp -= damage; if (hp < 0) hp = 0; } } }
Creature를 상속받는 Player 생성using System; using System.Collections.Generic; using System.Linq; using System.Text; using System.Threading.Tasks; namespace CSharpStudy { public enum PlayerType { None = 0, Knight = 1, Archer = 2, Mage = 3 } class Player : Creature { protected PlayerType type = PlayerType.None; // 매개변수를 받는 생성자를 생성시, 기본 생성자를 따로 만들어주지 않는 이상 기본 생성자는 사용 불가 protected Player(PlayerType type) : base(CreatureType.Player) { this.type = type; } public PlayerType GetPlayerType() { return type; } } class Knight : Player { public Knight() : base(PlayerType.Knight) { SetInfo(100, 10); } } class Archer : Player { public Archer() : base(PlayerType.Archer) { SetInfo(75, 12); } } class Mage : Player { public Mage() : base(PlayerType.Mage) { SetInfo(50, 15); } } }
Creature를 상속 받는 Monster 생성using System; using System.Collections.Generic; using System.Linq; using System.Text; using System.Threading.Tasks; namespace CSharpStudy { public enum MonsterType { None = 0, Slime = 1, Orc = 2, Skeleton = 3 } class Monster : Creature { protected MonsterType type; protected Monster(MonsterType type) : base(CreatureType.Monster) { this.type = type; } public MonsterType GetMonsterType() { return type; } } class Slime : Monster { public Slime() : base(MonsterType.Slime) { SetInfo(10, 1); } } class Orc : Monster { public Orc() : base(MonsterType.Orc) { SetInfo(20, 2); } } class Skeleton : Monster { public Skeleton() : base(MonsterType.Skeleton) { SetInfo(15, 5); } } }
TextRPG2 플레이어 & 몬스터 생성using System.Diagnostics.Tracing; using System.Numerics; namespace CSharpStudy { class Program { static void Main(string[] args) { Player player = new Knight(); Monster monster = new Orc(); int damage = player.GetAttack(); monster.OnDamaged(damage); } } }
# TextRPG2 게임 진행 & 마무리
TextRPG2 게임 진행을 위한 Game 생성using System; using System.Collections.Generic; using System.Linq; using System.Text; using System.Threading.Tasks; namespace CSharpStudy { public enum GameMode { None, Lobby, Town, Field } // 게임 진행과 관련된 전반적인 사항들을 관리 class Game { private GameMode mode = GameMode.Lobby; private Player player = null; private Monster monster = null; Random rand = new Random(); public void Process() { switch (mode) { case GameMode.Lobby: ProcessLobby(); break; case GameMode.Town: ProcessTown(); break; case GameMode.Field: ProcessField(); break; } } private void ProcessLobby() { Console.WriteLine("직업을 선택하세요"); Console.WriteLine("[1] 기사"); Console.WriteLine("[2] 궁수"); Console.WriteLine("[3] 법사"); string input = Console.ReadLine(); switch (input) { case "1": player = new Knight(); mode = GameMode.Town; break; case "2": player = new Archer(); mode = GameMode.Town; break; case "3": player = new Mage(); mode = GameMode.Town; break; } } private void ProcessTown() { Console.WriteLine("마을에 입장했습니다!"); Console.WriteLine("[1] 필드로 가기"); Console.WriteLine("[2] 로비로 돌아가기"); string input = Console.ReadLine(); switch (input) { case "1": mode = GameMode.Field; break; case "2": mode = GameMode.Lobby; break; } } private void ProcessField() { Console.WriteLine("필드에 입장했습니다!"); Console.WriteLine("[1] 싸우기"); Console.WriteLine("[2] 일정 확률로 마을 돌아가기"); CreateRandomMonster(); string input = Console.ReadLine(); switch (input) { case "1": ProcessFight(); break; case "2": TryEscape(); break; } } private void CreateRandomMonster() { int randValue = rand.Next(0, 3); switch (randValue) { case 0: monster = new Slime(); Console.WriteLine("슬라임이 생성되었습니다!"); break; case 1: monster = new Orc(); Console.WriteLine("오크가 생성되었습니다!"); break; case 2: monster = new Skeleton(); Console.WriteLine("스켈레톤이 생성되었습니다!"); break; } } private void ProcessFight() { while (true) { int damage = player.GetAttack(); monster.OnDamaged(damage); if (monster.IsDead()) { Console.WriteLine("승리했습니다"); Console.WriteLine($"남은 체력 : {player.GetHp()}"); break; } damage = monster.GetAttack(); player.OnDamaged(damage); if (player.IsDead()) { Console.WriteLine("패배했습니다"); mode = GameMode.Lobby; break; } } } private void TryEscape() { int randValue = rand.Next(0, 101); if (randValue < 33) { mode = GameMode.Town; } else { ProcessFight(); } } } }
TextRPG2 게임 진행using System.Diagnostics.Tracing; using System.Numerics; namespace CSharpStudy { class Program { static void Main(string[] args) { Game game = new Game(); while (true) { game.Process(); } } } }
[ 섹션 6. 자료구조 맛보기 ]
# 배열
- 배열은 참조 타입이다.
- foreach문은 배열, Collection 안의 일련의 데이터들을 차례로 처리하기 위해 사용되는 반복문이다.
배열 및 foreach문 응용namespace CSharpStudy { class Program { static void Main(string[] args) { // 배열 (참조 타입) int[] MathScores = new int[] { 10, 20, 30, 40, 50 }; int[] EngScores = { 40, 50, 70, 90 }; for (int i = 0; i < MathScores.Length; i++) { Console.WriteLine("MathScore : " + MathScores[i]); } foreach (int score in EngScores) { Console.WriteLine($"EngScore : {score}"); } } } }
# 다차원 배열
다차원 배열 응용 #1namespace CSharpStudy { class Program { static void Main(string[] args) { int[ , ] Array_1 = new int[ , ] { { 1, 2, 3 }, { 4, 5, 6 } }; int[ , ] Array_2 = { { 1, 2, 3 }, { 4, 5, 6 } }; } } }
다차원 배열 응용 #2namespace CSharpStudy { class Map { int[,] tiles = { { 1, 1, 1, 1, 1 }, { 1, 0, 0, 0, 1 }, { 1, 0, 0, 0, 1 }, { 1, 0, 0, 0, 1 }, { 1, 1, 1, 1, 1 } }; public void Render() { ConsoleColor defaultColor = Console.ForegroundColor; for (int y = 0; y < tiles.GetLength(0); y++) { for (int x = 0; x < tiles.GetLength(1); x++) { if (tiles[y, x] == 1) Console.ForegroundColor = ConsoleColor.Red; else Console.ForegroundColor = ConsoleColor.Green; Console.Write("\u25cf"); } Console.WriteLine(); } Console.ForegroundColor = defaultColor; } } class Program { static void Main(string[] args) { Map map = new Map(); map.Render(); } } }
가변 배열 응용namespace CSharpStudy { class Program { static void Main(string[] args) { int[][] a = new int[3][]; a[0] = new int[3]; a[1] = new int[6]; a[2] = new int[2]; a[0][0] = 1; } } }
# List
- List는 참조 타입이다.
- List는 배열과 달리 동적으로 크기 조절이 가능하다. 따라서 배열의 크기에 대해 크게 신경 쓸 필요가 없다.
~> 배열과 마찬가지로 인덱스를 사용하여 요소에 접근할 수 있다. (List가 최소 1개 이상의 데이터를 가져야 접근 가능)
List 응용namespace CSharpStudy { class Program { static void Main(string[] args) { List<int> list = new List<int>(); for (int i = 0; i < 5; i++) list.Add(i); // list의 맨 뒤에 데이터 추가 list.Insert(2, 999); // index를 통한 데이터 삽입 list.Remove(3); // 값을 통한 데이터 삭제 (여러개 존재할 경우 가장 처음으로 발견한 데이터를 삭제) list.RemoveAt(0); // index를 통한 데이터 삭제 list.Clear(); // list를 초기화 for (int i = 0; i < list.Count; i++) // list의 크기는 Length를 사용하는 배열과 달리 Count 사용 Console.WriteLine(list[i]); foreach (int num in list) Console.WriteLine(num); } } }
# Dictionary
- Dictionary는 참조 타입이다.
- Dictionary는 인덱스 대신 Key 값을 통해 Value 값을 찾는다.
- Hash Table을 사용하기 때문에 빠르지만, 메모리 낭비가 심하다.
Dictionary 응용namespace CSharpStudy { class Monster { public int id; public Monster(int id) { this.id = id; } } class Program { static void Main(string[] args) { Dictionary<int, Monster> dic = new Dictionary<int, Monster>(); for (int i = 0; i < 10000; i++) { dic.Add(i, new Monster(i)); } Monster monster; bool isFound = dic.TryGetValue(5000, out monster); dic.Remove(7777); dic.Clear(); } } }
+ 추가 검색 ( https://coding-shop.tistory.com/53 )
- ContainsKey() 와 TryGetValue() 차이점
~> ContainsKey() 와 TryGetValue() 는 Dictionary에 Key 존재 여부를 판단하고 bool Type을 return 한다.
~> ContainsKey() 는 Key와 연결된 Value 값을 출력하지 않는다.
~> TryGetValue() 는 Key와 연결된 Value 값을 출력한다.
[ 섹션 7. 알아두면 유용한 기타 문법 ]
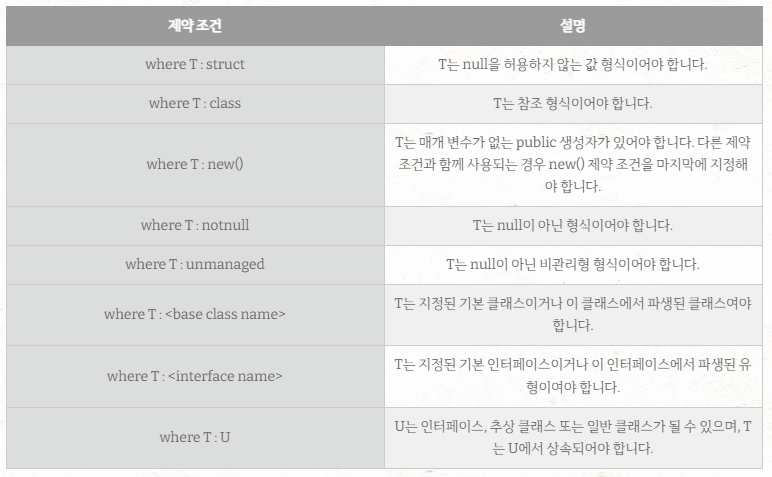
# Generic (일반화)
- Generic은 특정 데이터 타입에 국한되지 않고 모든 타입을 허용하는 Generic Class와 메소드를 구현할 수 있다.
~> 이때 특정 조건에만 대응되는 데이터 타입이 필요한 경우가 있는데, 이는 where Keyword를 사용하여 제약 조건을
추가할 수 있다.
Generic Class 응용namespace CSharpStudy { class Program { class MyList<T> { T[] arr = new T[10]; public T GetItem(int i) { return arr[i]; } } static void Main(string[] args) { MyList<int> myIntList = new MyList<int>(); int intItem = myIntList.GetItem(0); MyList<float> myFloatList = new MyList<float>(); float floatItem = myFloatList.GetItem(0); } } }
Generic Function 응용namespace CSharpStudy { class Program { static void GenericFunc<T>(T input) { Console.WriteLine(input); } static void Main(string[] args) { GenericFunc<int>(3); GenericFunc<float>(5.0f); } } }
- Object 타입은 모든 타입 (int, float ...) 부터 참조 (Class, string ...) 그리고 우리가 만들어내는 모든 데이터 Type들까지도
객체를 담을 수 있다.
~> 이러한 이유는 C#에서는 모든 데이터 Type이 Object를 상속 받도록 구조가 짜여져 있기 때문이다.
~> 하지만 마구잡이로 사용시 메모리 낭비가 발생하기 때문에 Boxing과 UnBoxing의 개념을 이해해야 한다.
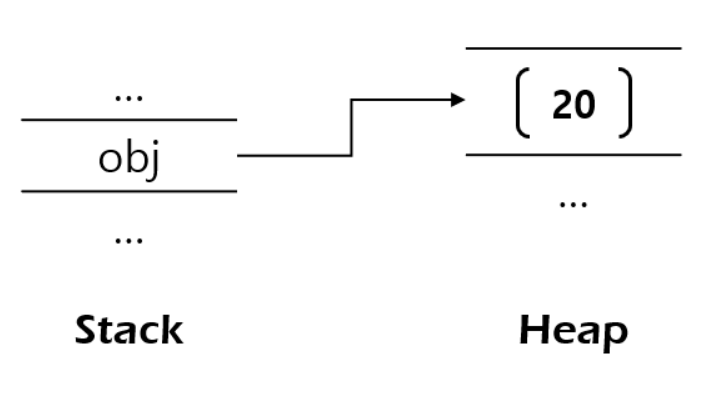
- Boxing이란 Stack 영역에 저장된 값 타입의 데이터를 Object 타입을 통해 Heap 영역에 저장하는 과정을 말한다.
~> 말 그대로 박스로 감싸는 과정이며, Object에 값 타입의 int 값을 넣으면 Stack 영역에 저장되어야 하는 값이 Box로
감싸져 Heap 영역에 저장된다.
- UnBoxing은 이렇게 Box로 감싸진 데이터를 풀어내는 과정을 말한다.
- Object obj = 5 가 Boxing의 예시, int a = (int)obj 가 UnBoxing의 예시이다.
# Interface (인터페이스)
- interface의 특징
~> C#은 다중 상속을 지원하지 않지만, interface는 다중 상속이 가능하다.
~> interface는 멤버 변수를 포함할 수 없다.
~> interface는 접근 제한 한정자를 사용할 수 없고, 구현부가 존재하지 않는다. (즉, 자체적으로 구현이 불가능)
~> interface를 상속받는 Class는 반드시 interface의 모든 메소드를 override (재정의) 해야 한다.
(override시 모든 메소드는 public 으로 선언)
~> interface는 객체 생성이 불가능하지만, interface를 상속 받은 Class는 객체 생성이 가능하다.
+ 추가 정리
- virtual과 abstract과 interface의 차이
virtual의 특징namespace CSharpStudy { class Monster { int hp; public virtual void Shout() { Console.WriteLine("Monster의 Shout!"); } } class Orc : Monster { public override void Shout() { Console.WriteLine("Orc의 Shout!"); } } class Skeleton : Monster { // virtual에 대한 override는 필수 X } class Program { static void Main(string[] args) { // virtual은 객체 생성 가능 Monster monster = new Monster(); } } }
abstract의 특징namespace CSharpStudy { abstract class Monster { int hp; public abstract void Shout(); // 자체적으로는 구현 불가능 } class Orc : Monster { public override void Shout() // abstract에 대한 override는 필수 { Console.WriteLine("Orc의 Shout!"); } } class Skeleton : Monster { public override void Shout() // abstract에 대한 override는 필수 { Console.WriteLine("Skeleton의 Shout!"); } } class Program { static void Main(string[] args) { // abstract은 객체 생성 불가능 // Monster monster = new Monster(); } } }
interface의 특징namespace CSharpStudy { abstract class Monster { int hp; public abstract void Shout(); } interface IFlyable { // 멤버 변수 포함 불가능 // bool isFly; void Fly(); // 접근 제한 한정자 사용 불가능, 자체적으로는 구현 불가능 } interface IRunable { // 멤버 변수 포함 불가능 // int speed; void Run(); // 접근 제한 한정자 사용 불가능, 자체적으로는 구현 불가능 } class Orc : Monster { public override void Shout() { Console.WriteLine("Orc의 Shout!"); } } class Skeleton : Monster { public override void Shout() { Console.WriteLine("Skeleton의 Shout!"); } } class FlyableOrc : Orc, IFlyable, IRunable // interface는 다중 상속 가능 { public void Fly() // 접근 제한 한정자는 반드시 public { Console.WriteLine("Orc의 Fly!"); // interface에 대한 override는 필수 } public void Run() // 접근 제한 한정자는 반드시 public { Console.WriteLine("Orc의 Run!"); // interface에 대한 override는 필수 } } class Program { static void Main(string[] args) { // interface는 객체 생성 불가능 // IFlyable iflyable = new IFlyable(); // interface를 상속 받은 Class의 객체 생성은 가능 FlyableOrc flyableOrc = new FlyableOrc(); } } }
+ 추가 검색 ( https://yasic-or-nunch.tistory.com/23 )
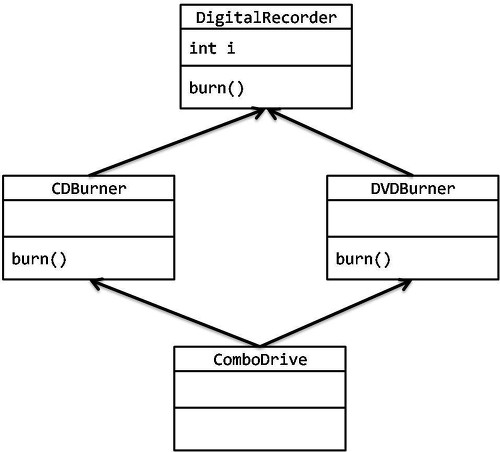
- C#은 다중 상속을 지원하지 않는다. 이러한 이유는 "죽음의 다이아몬드" 때문이다.
- 죽음의 다이아몬드란?
~> 1개의 부모 Class를 2개의 자식 Class가 상속 받고, 2개의 자식 Class를 다시 1개의 자식 Class가 상속 받는 것이다.
~> 위의 그림에서 ComboDrive가 burn() 함수를 호출시 어떤 부모 Class의 burn() 함수를 실행 시킬지 모호하다.
# Property (프로퍼티)
- Property는 OOP의 특징 중 하나인 은닉성을 위해 사용한다.
~> Property는 get과 set을 통해 private로 선언된 변수에 접근이 가능하도록 한다.
~> 정보 은닉을 위해 private로 선언하였으나, get과 set을 통해 변수에 접근할 수 있더라도 Property를 사용하는 이유는
변수의 값을 변경하거나 가져올 때 조건을 걸어서 변수의 접근을 제어할 수 있기 때문이다.
Property 응용namespace CSharpStudy { class Knight { private int hp; public int Hp { get { return hp; } set { hp = value; } // 기본적으로 매개변수는 value Keyword가 제공된다. } } class Program { static void Main(string[] args) { Knight knight = new Knight(); knight.Hp = 100; int hp = knight.Hp; } } }
자동 구현 Property 응용namespace CSharpStudy { class Knight { public int HP { get; set; } = 100 } class Program { static void Main(string[] args) { Knight knight = new Knight(); int hp = knight.HP; } } }
# Delegate (대리자)
- Delegate는 메소드 자체를 인자로 넘겨주는 형식이다. (함수가 아닌 형식 (int, string ...) 인 것에 유의)
~> 버튼 클릭시 발생하는 일들을 순차적으로 코딩할 경우 UI에 관련된 Logic과 게임과 관련된 Logic 사이에
간섭 및 복잡성이 발생하는 문제가 있다. 따라서 최대한 분리를 시켜 관리해야 장기적인 차원에서 유리하다.
~> Unity 자체에서 제공하는 Event 메소드들은 자체적으로 수정할 수 없다.
~> 위와 같은 문제들을 메소드 자체를 인자로 넘겨주는 Delegate 를 통해 해결할 수 있다.
- Delegate 목록에 실행할 메소드들을 등록 해두면 해당 Delegate가 등록된 함수들을 연쇄적으로 대신 실행시켜준다.
- Delegate 선언시 등록할 수 있는 함수의 조건을 제한한다. (매개변수, 반환값)
- Delegate를 직접 선언하지 않아도, C#에서 제공하는 Func, Action을 통해 Delegate 사용이 가능하다.
~> Anonymous Function (무명함수 or 익명함수) 을 통해 작성한다.
~> 반환값이 존재할 경우 Func을, 반환값이 존재하지 않을 경우 Action을 사용한다.
(Func의 < > 안에 들어있는 n개의 형식 중 마지막은 반환값, 나머지는 인자에 해당)
Delegate 응용using System.Diagnostics.Tracing; using System.Numerics; namespace CSharpStudy { class Program { // delegate : 메소드 자체를 인자로 넘겨주는 형식 // 인자 : X, 반환값 : int // OnClicked : delegate 형식의 이름 delegate int OnClicked(); static void ButtonPressed (OnClicked clickedFunction) { clickedFunction(); } static int TestDelegate() { Console.WriteLine("Hello Delegate"); return 0; } static int TestDelegate2() { Console.WriteLine("Hello Delegate2"); return 0; } static void Main(string[] args) { // delegate 사용 방법 #1 ButtonPressed(TestDelegate); ButtonPressed(TestDelegate2); // delegate 사용 방법 #2 (객체 생성 방법) OnClicked clicked = new OnClicked(TestDelegate); clicked += TestDelegate2; // 객체 생성시 delegate chaining 가능 clicked(); // delegate 사용 방법 #3 OnClicked clicked2 = new OnClicked(TestDelegate); clicked2 += TestDelegate2; // 객체 생성시 delegate chaining 가능 ButtonPressed(clicked2); } } }
# Event (이벤트)
- Event는 Observer Pattern 을 사용한다.
~> Observer Pattern 이란 한 객체의 상태가 바뀌면 해당 객체에 의존하는 다른 객체들한테 연락이 가서 자동으로 내용이
갱신되는 방식으로 1:N 의존성을 정의한다.
- delegate는 외부에서 호출이 가능하지만, event는 호출이 불가능하다. (구독 신청만 가능)
Event 응용을 위한 InputManager 생성using System; using System.Collections.Generic; using System.Linq; using System.Runtime.CompilerServices; using System.Text; using System.Threading.Tasks; namespace CSharpStudy { internal class InputManager { // delegate와 event의 접근 제한 한정자는 동일하게 설정 public delegate void OnInputKey(); public event OnInputKey InputKey; public void Update() { if (Console.KeyAvailable == false) return; ConsoleKeyInfo info = Console.ReadKey(); if (info.Key == ConsoleKey.A) { // 해당 event를 구독 신청한 구독자들에게 알려준다. InputKey(); } } } }
Event 응용using System.Diagnostics.Tracing; using System.Numerics; namespace CSharpStudy { class Program { static void Main(string[] args) { static void OnInputTest() { Console.WriteLine("Input Received!"); } InputManager inputManager = new InputManager(); inputManager.InputKey += OnInputTest; // OnInputTest 메소드가 InputKey event를 구독 신청 while (true) { inputManager.Update(); // event는 외부에서 호출이 불가능 (delegate와 가장 큰 차이점) // inputManager.InputKey(); } } } }
# Lambda (람다식)
- Lambda 를 사용하는 이유는 대체로 간결하고 가독성이 높은 코드 작성을 위해 사용된다.
~> 또한 복잡한 코드를 더욱 쉽게 작성하여 개발자의 생산정을 높여주고, 코드의 유지 보수성을 높일 수 있다.
무명 함수 및 Lambda 응용using System.Diagnostics.Tracing; using System.Numerics; namespace CSharpStudy { enum ItemType { Weapon, Armor, Amulet, Ring } enum Rarity { Normal, Uncommon, Rare } class Item { public ItemType itemType; public Rarity rarity; } class Program { static List<Item> _items = new List<Item>(); delegate bool ItemSelector(Item item); static Item FindItem(ItemSelector selector) { foreach (Item item in _items) { if (selector(item)) return item; } return null; } static void Main(string[] args) { _items.Add(new Item() { itemType = ItemType.Weapon, rarity = Rarity.Normal }); _items.Add(new Item() { itemType = ItemType.Armor, rarity = Rarity.Uncommon }); _items.Add(new Item() { itemType = ItemType.Ring, rarity = Rarity.Rare }); // Anonymous Function (무명 함수 or 익명 함수) Item item = FindItem(delegate (Item item) { return item.itemType == ItemType.Weapon; }); // Lambda (람다식) Item item2 = FindItem((Item item) => { return item.itemType == ItemType.Weapon; }); } } }
Func 및 Lambda 응용using System.Diagnostics.Tracing; using System.Numerics; namespace CSharpStudy { enum ItemType { Weapon, Armor, Amulet, Ring } enum Rarity { Normal, Uncommon, Rare } class Item { public ItemType itemType; public Rarity rarity; } class Program { static List<Item> _items = new List<Item>(); static Item FindItem(Func<Item, bool> selector) { foreach (Item item in _items) { if (selector(item)) return item; } return null; } static void Main(string[] args) { _items.Add(new Item() { itemType = ItemType.Weapon, rarity = Rarity.Normal }); _items.Add(new Item() { itemType = ItemType.Armor, rarity = Rarity.Uncommon }); _items.Add(new Item() { itemType = ItemType.Ring, rarity = Rarity.Rare }); // Anonymous Function (무명 함수 or 익명 함수) Item item = FindItem(delegate (Item item) { return item.itemType == ItemType.Weapon; }); // Lambda (람다식) Item item2 = FindItem((Item item) => { return item.itemType == ItemType.Weapon; }); } } }
# Exception (예외 처리)
- Exception은 throw-try-catch-finally 문을 통해 사용할 수 있다.
~> throw 문을 통해 예외를 던진다.
~> try 문에 예외가 발생할 수 있는 소스코드를 작성한다.
~> catch 문에 예외를 처리하는 소스코드를 작성한다.
~> finally 문에 예외 발생 여부와 상관없이 항상 실행되는 소스코드를 작성한다.
- 발생한 예외가 특정 catch 문에 해당할 경우 해당 catch 문을 제외한 나머지 catch 문은 실행되지 않는다.
- 모든 예외는 Exception Class를 상속 받는다.
~> 따라서 catch 문 간의 순서가 중요하다.
(Exception catch문이 catch문 중 가장 위에 위치할 경우 아래의 catch문들은 평생 실행되지 X)
- 게임 업계에서 게임 Logic에 대해서는 Exception 을 잘 사용하지 X
~> Exception 을 사용하여 예외를 처리하기보다는 Crash를 통한 오류 수정이 더욱 중요하다.
Exception 응용using System.ComponentModel; using System.Diagnostics.Tracing; using System.Numerics; namespace CSharpStudy { class Program { class TestException : Exception { int a, b, result; public TestException() { this.a = 10; this.b = 0; this.result = a / b; } } static void Main(string[] args) { try { throw new TestException(); } catch (DivideByZeroException e) { Console.WriteLine("0으로 나눌 수 없습니다!"); } catch (Exception e) { Console.WriteLine("또 다른 예외가 발생했습니다!"); } finally { Console.WriteLine("반드시 실행되는 구문!"); } } } }
# Reflection (리플렉션)
- C#은 Reflection 기능을 지원한다. 이는 객체(Instance)를 토대로 데이터타입의 메타적인 정보를 가져오는 기법이다.
~> Reflection은 조사, Instance 생성, 기존 개체에서 형식을 가져와 호출, 접근 기능을 제공한다.
~> using System.Reflection; 을 통해 Reflection 기능을 사용할 수 있다.
- Attribute는 코드에 대한 부가 정보를 기록하고 읽을 수 있는 기능이다.
~> 주석은 사람이 작성하고 사람이 읽는 정보라면, Attribute는 사람이 작성하고 컴퓨터가 읽는 정보이다.
~> Attribute는 Metadata 형식으로 저장되며, Compile time, Runtime 시에도 컴퓨터에게 정보를 제공한다.
~> 미리 구현된 Attribute도 존재하며, 직접 Attribute를 만들 수도 있다.
(Unity에서 자주 사용하는 Attribute는 대표적으로 [ SerializeField ] 가 존재)
Reflection 및 Attribute 응용using System.ComponentModel; using System.Diagnostics.Tracing; using System.Numerics; using System.Reflection; namespace CSharpStudy { class Program { class Important : System.Attribute // Custom Attribute는 System.Attribute를 상속 받아 구현 { string msg; public Important(string msg) { this.msg = msg; } } class Monster { [Important("My Important variable")] public int hp; protected int attack; private float speed; void Attack() { } } static void Main(string[] args) { // Reflection : X-Ray Monster monster = new Monster(); Type type = monster.GetType(); FieldInfo[] fields = type.GetFields(System.Reflection.BindingFlags.Public | System.Reflection.BindingFlags.NonPublic); foreach (FieldInfo field in fields) { string access = "None"; if (field.IsPublic) access = "Public"; else if (field.IsPrivate) access = "Private"; var attributes = field.GetCustomAttributes(); Console.WriteLine($"{access} {field.FieldType.Name} {field.Name}"); } } } }
# Nullable (널러블)
- Nullable은 Null을 가질 수 없는 데이터 타입을 Null을 가질 수 있는 타입으로 만든 새로운 타입이다.
~> 일반적으로 값 타입들 (int, double, bool, struct ...) 이 Null을 가질 수 없다.
Nullable 응용using System.ComponentModel; using System.Diagnostics.Tracing; using System.Numerics; using System.Reflection; namespace CSharpStudy { class Monster { public int Id { get; set; } } class Program { static void Main(string[] args) { // Nullable -> Null + able int? number = null; int value; Monster monster = null; // int number의 Null 확인 방법 #1 if (number != null) { value = number.Value; } // int number의 Null 확인 방법 #2 if (number.HasValue) { value = number.Value; } // int number의 Null 확인 방법 #3 value = number ?? 0; // number가 Null이 아닐 경우 해당 값으로, Null일 경우 0으로 초기화 // 참조 타입인 class에서도 사용이 가능하다. // Monster monster의 Null 확인 방법 #1 (아래의 주석 처리된 코드들을 한 줄로 끝낼 수 있다.) int? id = monster?.Id; // monster가 Null이 아닐 경우 해당 값으로, Null일 경우 null로 초기화 // if (monster != null) // int id = monster.Id; // else // int id = 0; } } }